How to Tie the Parachute Adams: The Complete Guide (All Variants)
Estimated read time: 11 minutes
The Adams is the most famous dry fly in the world. Tied by Leonard Halladay in 1922 for his friend Charles Adams on the Boardman River in Michigan, it was designed to imitate nothing specifically — and everything generally. Its grey, brown, and grizzly combination suggests a wide range of mayfly species in a way that no single precise imitation can. It works everywhere.
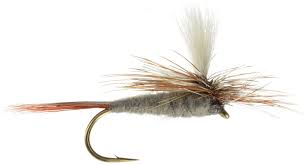
The Parachute Adams is the modern evolution of that original pattern. By replacing the traditional upright wing with a white parachute post — a small wing of white calf hair or poly yarn from which the hackle wraps horizontally rather than vertically — it gains two significant advantages: it sits lower in the surface film, in the posture of a natural emerging mayfly, and it becomes dramatically more visible to the angler. That white post is a landmark on the water that lets you track the fly through complex currents and low light conditions where a traditional Adams would disappear.
For the tyer, the Parachute Adams is the graduation piece of the beginner's journey. It's more demanding than the Woolly Bugger, Hare's Ear, Elk Hair Caddis, or Pheasant Tail — parachute post construction and horizontal hackle application require precision and practice. But mastering it opens the door to the full universe of dry fly tying. Almost every dry fly technique you'll ever need is present in the Parachute Adams.
This guide covers the standard Parachute Adams, key variants, and the core techniques that make it work — with step-by-step instructions and an embedded tying video from The Feather Bender.
Table of Contents
- Why the Parachute Adams Works
- Materials You'll Need
- The Parachute Adams: Step by Step
- Tying Video: Parachute Adams
- Key Variants
- Size and Colour Variations
- How to Fish the Parachute Adams
- Frequently Asked Questions
Why the Parachute Adams Works
The Parachute Advantage
Traditional dry flies sit on the surface on their hackle tips, with the body elevated above the water — a posture that doesn't closely match any natural insect. A parachute fly sits differently: the body lies flush in or just above the surface film, in the horizontal posture of a natural mayfly dun resting on the water. Fish see a more convincing silhouette, and refusals decrease on selective fish in clear water.
Visibility for the Angler
The white parachute post is visible at distances and in conditions where a traditional hackled dry fly is invisible. On broken water, in fading light, at the tail of a long pool — the white post is a landmark. This visibility means you see takes you'd otherwise miss entirely, and you can follow the fly through complex drift lines with confidence.
Universal Mayfly Imitation
The Adams colour scheme — grey body, brown and grizzly hackle — is one of the most broadly effective combinations in dry fly tying. It matches the majority of grey-winged mayfly species in varying sizes, making the Parachute Adams a reliable searching pattern on any river where mayflies are present.
Materials You'll Need
For the Standard Parachute Adams
| Material | Specification | Notes |
|---|---|---|
| Hook | Dry fly hook, size 10–20 | Tiemco 100, Mustad R30, or equivalent |
| Thread | 8/0, grey or tan | Fine thread — bulk ruins dry flies |
| Tail | Brown and grizzly hackle fibres mixed | 8–10 fibres, hook shank length |
| Post | White calf body hair or white poly yarn | The parachute base — must be upright |
| Abdomen | Adams grey superfine or muskrat dubbing | Slim and tapered |
| Hackle | Brown and grizzly dry fly hackle, mixed | Sized to hook — fibres = hook gap |
Tools Required
- Fly tying vise (rotary helpful for parachute hackle)
- Bobbin and thread
- Fine-tipped scissors
- Hackle pliers
- Whip finisher
- Head cement or UV resin
- Dubbing needle
A Note on Hackle Quality
The Parachute Adams demands genuine dry fly hackle more than any other pattern in this series. The hackle wraps horizontally around the post — if the fibres aren't stiff and water-repellent, the fly will sink. Use quality saddle or cape hackle from Whiting, Metz, or Keough. Soft, webby hackle will not work here.
The Parachute Adams: Step by Step
Step 1: Set Up the Hook
Secure the dry fly hook in the vise. Start your thread at the midpoint of the shank — not at the eye, and not at the bend. You'll be building the post here first before doing anything else.
Step 2: Build and Erect the Post
This is the defining step of the Parachute Adams — and the one that determines whether the finished fly will fish well. The post must stand upright and be firmly anchored.
Calf hair post: cut a small bunch of white calf body hair — approximately the diameter of a matchstick. Stack it in a hair stacker, clean out the underfur, and tie it in at the midpoint of the shank with the tips pointing forward over the eye. Take several firm thread wraps to secure it, then stand the hair upright by pushing your thread against the base of the bunch from the front and wrapping several horizontal turns around the base of the post itself. These base wraps lock the post vertical.
Poly yarn post: easier for beginners. Cut a short length of white poly yarn (about 3cm) and tie it in at the midpoint of the shank. Stand it upright with horizontal base wraps as above. Trim to the desired post height — approximately one hook shank length is standard.
Post height: the post should be approximately one hook shank length tall. Too short and it's difficult to wrap the hackle around; too tall and the fly is top-heavy and unbalanced.
Tip: the post is the foundation of the fly. If it leans forward, backward, or to the side, the finished fly will sit unevenly on the water. Take time here. Wrap the base of the post firmly and check it from multiple angles before proceeding.
Step 3: Tie In the Tail
Wrap the thread back to the bend. Select 8–10 hackle fibres — a mix of brown and grizzly — and tie them in as a tail. The tail should extend approximately one hook shank length beyond the bend.
Mix the brown and grizzly fibres together before tying in — the combination produces the classic Adams tail profile. Pinch them together and align the tips before tying in.
Step 4: Dub the Abdomen
Apply a thin, even rope of grey dubbing to the thread and wrap forward, building a slim, slightly tapered abdomen from the bend to just behind the post. Stop directly behind the post — the abdomen does not continue in front of it.
Keep the abdomen sparse. A heavy abdomen makes the fly sit low in the water and reduces flotation. Grey superfine or muskrat dubbing produces the correct slim, smooth profile.
Step 5: Tie In the Hackles
Select one brown and one grizzly dry fly hackle feather, both sized so the fibres are approximately equal to the hook gap. Strip the base fibres from both stems and tie them in together at the base of the post, on the near side, with the shiny sides of both feathers facing upward.
Wrap the thread up the post two or three turns to hold the hackle stems against it. The hackles will be wrapped around the post downward — this is the parachute hackle technique.
Tip: tying in two hackles together — one brown, one grizzly — produces the classic mixed Adams hackle. Some tyers use a single feather; both approaches work.
Step 6: Dub the Thorax
Apply a slightly fuller amount of grey dubbing and wrap a small thorax in front of the post, covering the area between the post and the eye. Leave a small gap behind the eye for the hackle tie-off. The thorax should be slightly fuller than the abdomen.
Step 7: Wrap the Parachute Hackle
This is the most technically demanding step in the Parachute Adams — and in dry fly tying generally. Take your time.
Grasp both hackle feathers with hackle pliers and wrap them around the base of the post, working downward from the top of the post toward the hook shank. Each wrap should sit just below the previous one. Apply 3–5 turns for most hook sizes.
After completing the wraps, bring both hackles down to the hook shank, hold them firmly against the shank just in front of the thorax, and tie them off with several firm thread wraps. Trim the excess stems close.
Tip: keeping the hackle wraps tight against each other and working consistently downward is the key to a neat parachute hackle. Loose or uneven wraps produce a messy, poorly floating fly. Watch the video for this step particularly carefully before attempting it.
Step 8: Build the Head and Finish
Build a small, neat thread head between the hackle tie-off and the eye. Whip finish and apply head cement or UV resin.
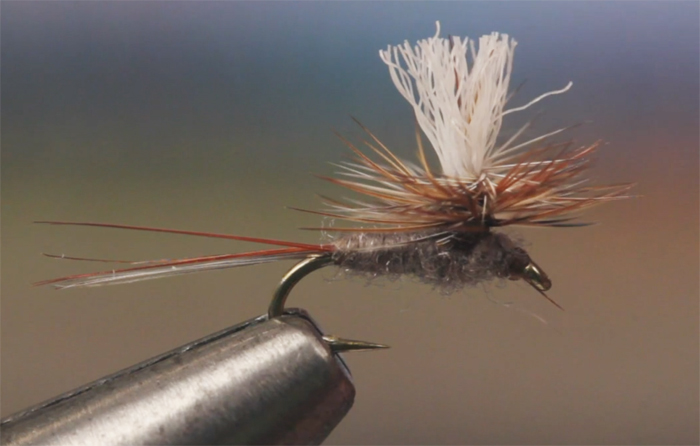
The finished fly should show a clearly upright white post, even hackle fibres splaying horizontally around the post base, a slim grey body, and a compact head. Viewed from above, the hackle fibres should radiate evenly from the post like spokes from a hub.
Tying Video: Parachute Adams
The Feather Bender is one of the best resources for parachute dry fly tying — their attention to detail on post construction and parachute hackle application is particularly valuable for this pattern. Watch the full video before starting your first attempt.
Video credit: The Feather Bender — essential viewing for parachute dry fly technique.
Key Variants
Parachute BWO (Blue Winged Olive)
The same tying sequence with an olive body and olive or brown hackle, in sizes 16–20. The Blue Winged Olive is one of the most important mayfly hatches in the world — hatching on overcast, drizzly days from early spring through late autumn. A Parachute BWO in size 18 is one of the most useful flies you can tie.
Differences from standard:
- Body: olive superfine dubbing
- Hackle: medium olive or brown
- Size: 16–20
Parachute PMD (Pale Morning Dun)
A pale, cream-yellow variant imitating the Pale Morning Dun — a major hatch on many western rivers. Tie in sizes 16–18 with pale yellow or cream dubbing and light ginger hackle.
Differences from standard:
- Body: pale yellow or cream dubbing
- Hackle: light ginger
- Size: 16–18
CDC Parachute
Substitutes a CDC (Cul de Canard) feather or CDC fibres for the post material. CDC is naturally water-repellent and buoyant — a CDC post creates an exceptionally visible, naturally floating fly. More delicate than calf hair or poly yarn but beautiful to fish.
Important: use powder floatant only on CDC variants — paste floatants destroy CDC's natural buoyancy.
Hi-Vis Parachute
Uses a large, highly visible post — fluorescent orange, chartreuse, or pink — for low-light fishing and broken water where a white post is difficult to see. The bright post makes the fly visible at long range and in choppy conditions. Fish it exactly as the standard pattern.
Size and Colour Variations
Standard Size Range
- Size 10–12: large mayfly imitation, fast broken water, early season searching
- Size 14–16: the most useful all-round sizes for most river situations
- Size 18–20: clear water, selective fish, small mayfly hatches (BWO, Trico)
- Size 22+: ultra-fine midge fishing on tailwaters — extremely demanding to tie
Colour by Season
Grey (standard): year-round general pattern. The Adams colour scheme matches the most common mayfly species across most of the world.
Olive: spring through early summer, particularly on overcast days when BWO hatches are most active.
Pale yellow/cream: midsummer PMD hatches; clear, warm water conditions.
Rust/brown: autumn mayfly species; late season fishing.
How to Fish the Parachute Adams
The Standard Dead Drift
Cast upstream and across, mend line immediately after the cast, and follow the fly with your rod tip as it drifts back toward you. The white post makes line management easier — you can see exactly where the fly is and mend accordingly without disturbing the presentation.
Strike by lifting the rod firmly when you see the post disappear or the fish rise in the fly's location. The parachute posture means fish often take confidently — the take can be more subtle than on a high-riding traditional Adams.
Fishing During a Hatch
When fish are rising selectively during a mayfly hatch, match the size first, colour second. A size 16 Parachute Adams in grey covers the majority of common mayfly hatches in most rivers. Cast to actively rising fish by placing the fly a metre or more upstream of the rise and allowing it to drift naturally into the fish's feeding lane.
The refusal: if a fish rises to your fly and turns away at the last moment, consider dropping one size smaller before changing pattern. Selective fish often refuse because the fly is slightly too large rather than because the pattern is wrong.
Low Light and Evening Fishing
The white post earns its keep in low light. As visibility fades on an evening rise, the Parachute Adams remains trackable long after a traditional dry fly has disappeared. Switch to a Hi-Vis post variant (orange or chartreuse) as light fades further.
Spring Creeks and Selective Fish
The parachute's flush-in-the-film posture makes it significantly more effective than traditional hackled dry flies on pressured, selective fish in clear, slow water. On spring creeks and chalk streams — where fish have long inspection times and refuse anything that doesn't look right — the Parachute Adams consistently outperforms high-riding alternatives.
Pair with 6X or 7X tippet for maximum effectiveness on selective fish. The finer the tippet, the more naturally the fly behaves.
🎣 Log your dry fly sessions. Hatch timing, fly size, water temperature — the variables that determine dry fly success are highly specific to individual waters. Logging your sessions on Flyloops builds a personalised hatch calendar for your home water over time. Start your free logbook →
Frequently Asked Questions
Is the Parachute Adams hard to tie? It's the most demanding pattern in the beginner series — parachute post construction and horizontal hackle application require more precision than nymph or streamer tying. Expect your first few attempts to be imperfect. Tie the Woolly Bugger, Hare's Ear, Elk Hair Caddis, and Pheasant Tail first — the skills developed in those patterns make the Parachute Adams significantly more approachable.
What's the best post material for a beginner? White poly yarn is the easiest starting point. It's forgiving, easy to stand upright, doesn't require stacking, and produces a visible, durable post. Calf body hair produces a more natural look but is harder to work with. Start with poly yarn and switch to calf hair once you're comfortable with the technique.
My parachute hackle keeps collapsing — what am I doing wrong? Usually caused by: hackle fibres that are too soft (use genuine dry fly hackle only); wrapping the hackle upward rather than downward around the post; or not enough wraps (aim for at least 3–4 turns). Watch the tying video specifically for the hackle application step and replicate the technique exactly.
What size should I start with? Size 14. It gives you enough room on the hook shank to work comfortably while building the skills for smaller sizes. Once you can tie a clean size 14, move to 16. The jump from 16 to 18 is where the real precision challenge begins.
Why does my finished fly lean to one side? The post wasn't erected vertically. Once the post leans it's very difficult to correct after the fact. Take extra time in Step 2 — wrap the base of the post firmly with horizontal turns from multiple directions and check it from the front, back, and sides before proceeding.
Can I use a single hackle feather instead of brown and grizzly mixed? Yes. A single grizzly hackle produces a perfectly effective Parachute Adams. The mixed brown and grizzly combination is traditional and slightly more complex in appearance, but the difference in fish-catching effectiveness is minimal. Start with a single feather if mixing two is adding too much complexity.
How do I apply floatant to a Parachute Adams? Apply paste floatant (Gink, Loon Aquel) sparingly to the hackle and body before fishing — not to the post. The post should remain dry and white for visibility. After catching a fish, false cast to dry the fly and re-apply if needed. If the fly becomes waterlogged, dry it thoroughly with amadou or a desiccant powder before re-applying floatant.
Is the Parachute Adams better than the standard Adams? For most fishing situations, yes. The parachute posture is more convincing to selective fish, the white post dramatically improves visibility for the angler, and the fly sits more naturally in the surface film. The traditional Adams still has a place — some anglers prefer its action in fast, broken water — but the Parachute Adams is the more versatile and widely used pattern today.
Tied your first Parachute Adams? You've completed the five-pattern beginner series. Log your first session fishing it on Flyloops and start building your dry fly knowledge base.