How to Tie the Elk Hair Caddis: The Complete Guide (All Variants)
Estimated read time: 10 minutes
The Elk Hair Caddis is one of the great dry flies. Designed by American tier Al Troth in 1957, it's spent nearly seventy years proving itself on rivers across the world — and it's still in most experienced fly anglers' boxes today. Simple to tie, durable, highly visible, and devastatingly effective during caddis hatches, it's also one of the best searching dry flies available when nothing specific is hatching.
For the beginner tyer, the Elk Hair Caddis is the ideal first dry fly. It teaches the foundational skills of dry fly construction — dubbing a body, palmering a hackle, stacking and tying in a hair wing — without the demanding proportions of more complex patterns like the Parachute Adams. And because it floats high and is easy to see on the water, it's also a pleasure to fish.
This guide covers the standard Elk Hair Caddis, the X-Caddis emerger variant, the CDC Caddis, and colour variations — with step-by-step instructions and an embedded tying video from The Feather Bender.
Table of Contents
- Why the Elk Hair Caddis Works
- Materials You'll Need
- The Standard Elk Hair Caddis: Step by Step
- Tying Video: Elk Hair Caddis
- The X-Caddis Emerger
- The CDC Caddis
- Colour Variations and When to Use Them
- How to Fish the Elk Hair Caddis
- Frequently Asked Questions
Why the Elk Hair Caddis Works
Caddisflies are among the most important aquatic insects in fly fishing. Unlike mayflies, which drift helplessly on the surface during emergence, adult caddis are active — they skitter, flutter, and run across the surface before taking flight. This movement triggers aggressive, splashy rises that are unmistakably caddis.
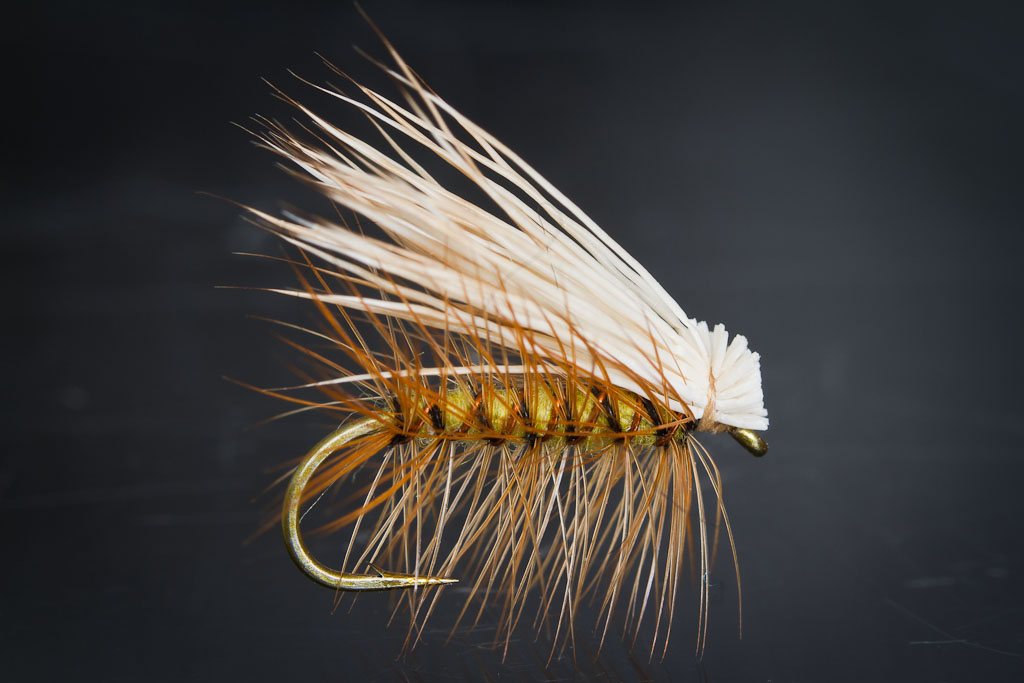
The Elk Hair Caddis imitates the adult caddis at rest and in motion. Its key features:
The elk hair wing: elk hair is hollow, which makes it naturally buoyant. A properly tied elk hair wing sits low over the body in the characteristic tent-wing profile of a resting caddis adult — but it also floats exceptionally well in rough water. The hair tips, left uncut, create the slight flare of a caddis wing perfectly.
The palmered hackle: a hackle wrapped along the length of the body — rather than just at the head — creates a broader footprint on the surface, imitating the legs of a caddis and helping the fly ride high in fast, broken water. This is what gives the Elk Hair Caddis its characteristic rough silhouette and excellent flotation.
The dubbed body: the simple dubbed body in tan, olive, or brown matches the abdomen colour of the most common caddis species. It's not precise — but it doesn't need to be.
Beyond caddis hatches, the Elk Hair Caddis works as a general attractor dry fly on any river where fish are looking up. Its high-riding profile and visibility make it an excellent searching pattern throughout the season.
Materials You'll Need
For the Standard Elk Hair Caddis
| Material | Specification | Notes |
|---|---|---|
| Hook | Dry fly hook, size 10–18 | Tiemco 100, Mustad R30, or equivalent |
| Thread | 6/0 or 8/0, tan or brown | Match to body colour |
| Rib | Fine gold wire | Adds durability to the hackle |
| Body | Hare's ear or superfine dubbing, tan/olive/brown | Keep it slim |
| Hackle | Brown or grizzly dry fly hackle | Size to hook — fibres = 1.5x hook gap |
| Wing | Elk hair or deer hair, natural tan | The defining material |
Tools Required
- Fly tying vise
- Bobbin and thread
- Fine-tipped scissors
- Hackle pliers
- Hair stacker (essential for even wing tips)
- Whip finisher
- Head cement or UV resin
Note on the hair stacker: this is one pattern where a hair stacker is not optional. Aligning the elk hair tips before tying in the wing is essential — uneven tips produce a messy, unbalanced wing that ruins the fly's profile. If you don't have a stacker, get one before tying this pattern.
The Standard Elk Hair Caddis: Step by Step
Step 1: Set Up the Hook
Secure the dry fly hook in the vise. Start your thread behind the eye and wrap a smooth, even thread base back to the bend. Keep the thread base thin — excess bulk on a dry fly hook affects the fly's balance and flotation.
Step 2: Tie In the Rib
Tie in a length of fine gold wire at the bend. Let it hang while you build the body — you'll wrap it forward over the hackle to lock it in place.
Step 3: Tie In the Hackle
Select a dry fly hackle feather with fibres approximately 1.5 times the hook gap in length. Strip the base fibres and tie the hackle in at the bend by its tip, shiny side forward. Leave it hanging — you'll palmer it forward after the body is dubbed.
Tip: use a proper dry fly hackle — stiff, shiny fibres that repel water. Soft, webby hackle (suitable for wet flies and Woolly Buggers) won't keep a dry fly floating in fast water. Whiting, Metz, and Keough are all excellent dry fly hackle suppliers.
Step 4: Dub the Body
Apply a thin, even rope of dubbing to the thread and wrap forward, building a slightly tapered body from the bend to about two-thirds up the shank. Keep it slim — a fat body makes the fly sit low in the water and reduces flotation.
Tip: dry fly bodies should be leaner than nymph bodies. The dubbing is primarily for colour and profile, not bulk. If your body looks a little sparse, it's probably about right.
Step 5: Palmer the Hackle
Using hackle pliers, grasp the butt of the hackle feather and palmer it forward over the dubbed body in evenly spaced turns — 5–7 turns for most hook sizes. The hackle fibres should splay outward from the body at roughly 90 degrees.
Tie off the hackle at the front of the body (not at the eye — leave room for the wing) and trim the excess stem.
Step 6: Counter-Wrap the Rib
Wrap the gold wire forward over the hackle in the opposite direction to the hackle wraps. This counter-wrapping locks the hackle stem against the body, preventing it from unwrapping when a fish takes the fly or the hackle gets damaged. Tie off and trim the wire.
Tip: counter-wrapping the rib dramatically extends the life of the fly. A reinforced Elk Hair Caddis can catch a dozen fish before needing replacement; an unreinforced one may come apart after the first.
Step 7: Stack and Prepare the Elk Hair Wing
Cut a small bunch of elk hair from the hide — approximately the diameter of a pencil for a size 14 hook. Remove the underfur by rolling the hair between your fingers and blowing it out, or by using a fine-tooth comb.
Place the cleaned hair tips-first into your hair stacker and tap it firmly on the table several times. Remove the hair carefully by the tips — the stacker has aligned them evenly. Do not disturb the tips before tying in.
Tip: the amount of elk hair matters. Too much and the wing is bulky and difficult to tie in cleanly; too little and the fly lacks buoyancy and profile. A pencil-diameter bunch for a size 14 is a reliable starting point.
Step 8: Tie In the Wing
Hold the stacked elk hair over the hook with the tips extending just beyond the bend of the hook (approximately one hook shank length past the tie-in point). Pinch the hair firmly against the hook shank and take two loose thread wraps over it, then tighten progressively. Do not let the hair spin around the hook.
The critical technique here is the pinch wrap: pinch the hair between thumb and forefinger directly above the hook shank, take the thread up between your fingers to the near side of the hook, over the top of the hair, down the far side, and under the shank — tightening as it comes back up. This keeps the hair on top of the shank rather than allowing it to roll.
Take several more firm wraps to lock the wing in place, then lift the butt ends of the hair and trim at an angle to create a neat, tapered head.
Step 9: Build the Head and Finish
Build a small, neat thread head over the trimmed hair butts. Whip finish and apply head cement or UV resin. The finished fly should have the wing sitting low over the body in a tent-wing profile, the hackle fibres splayed evenly, and a compact head.
Tying Video: Elk Hair Caddis
The Feather Bender brings their characteristically clear, methodical instruction to the Elk Hair Caddis — pay particular attention to their technique for stacking and tying in the elk hair wing, which is where most beginners struggle.
Video credit: The Feather Bender — highly recommended for clear, detailed instruction on classic dry fly patterns.
The X-Caddis Emerger
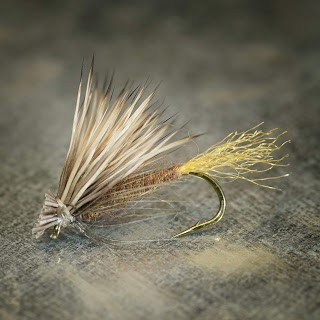
Source: nwschoolofflyfishing.com
The X-Caddis, designed by Craig Mathews and John Juracek, is a caddis emerger that sits partially in the surface film rather than on top of it — imitating a caddis in the process of emerging from its pupal shuck. It's particularly effective when fish are feeding on emerging caddis just below or at the surface but refusing fully floating adults.
How to Tie the X-Caddis
The X-Caddis is simpler than the standard Elk Hair Caddis — no palmered hackle, no rib.
Materials:
- Hook: dry fly hook, size 14–18
- Thread: tan or brown, 8/0
- Shuck: amber or tan Z-lon or Antron yarn (trailing shuck at the bend)
- Body: hare's ear or superfine dubbing, matching shuck colour
- Wing: elk hair or deer hair, tied sparse
Tying sequence:
- Start thread and wrap to bend
- Tie in a short trailing shuck of Z-lon or Antron yarn (3–4mm long) at the bend — this imitates the pupal shuck the adult is emerging from
- Dub a slim body forward to two-thirds of the shank
- Stack and tie in a sparse elk hair wing exactly as for the standard pattern
- Build a small head, whip finish, and cement
The X-Caddis fishes flush in the film rather than on top of it. This lower profile is often more effective on pressured fish that have seen a lot of high-riding adults.
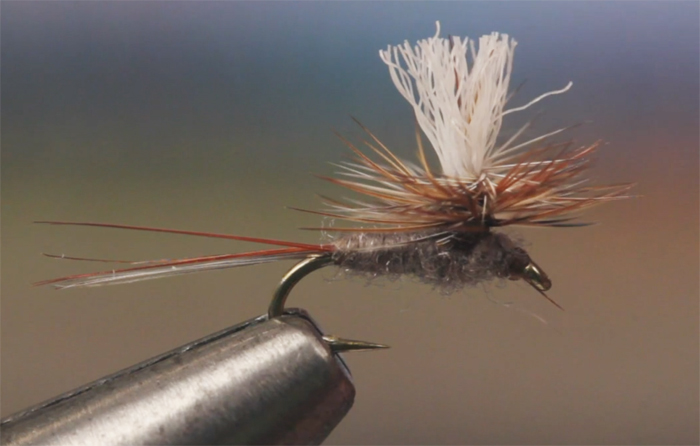
The CDC Caddis
CDC (Cul de Canard) feathers — taken from around the preen gland of a duck — are naturally waterproof and extraordinarily buoyant. A CDC Caddis substitutes CDC fibres for the elk hair wing, producing a softer, more delicate fly that sits lower in the film and is deadly on selective fish in slow, clear water.
Key Differences from the Standard Pattern
- Wing: CDC fibres tied in as a loop or flat wing replace the elk hair
- Body: same dubbed body, but no palmered hackle — the CDC wing provides sufficient flotation
- Use case: spring creeks, chalk streams, slow flat water, selective fish
Important: CDC feathers are extremely water-absorbent if treated with standard floatant pastes. Use powder floatant or Frog's Fanny only — paste floatants destroy CDC's natural buoyancy permanently.
Colour Variations and When to Use Them
Caddis species vary in colour depending on region, season, and species. The most useful colour variations:
Tan / Natural
The standard colour. Imitates the most common caddis species in most rivers worldwide. A tan body with brown hackle and natural elk hair wing covers the majority of situations. Tie and fish this first.
Best for: general caddis hatches, searching, most river conditions
Olive
Many caddis species in the green sedge family have distinctly olive bodies. An olive-dubbed Elk Hair Caddis with brown or olive hackle is often more effective than tan during green sedge hatches, particularly in spring.
Best for: spring hatches, rivers with significant green sedge populations
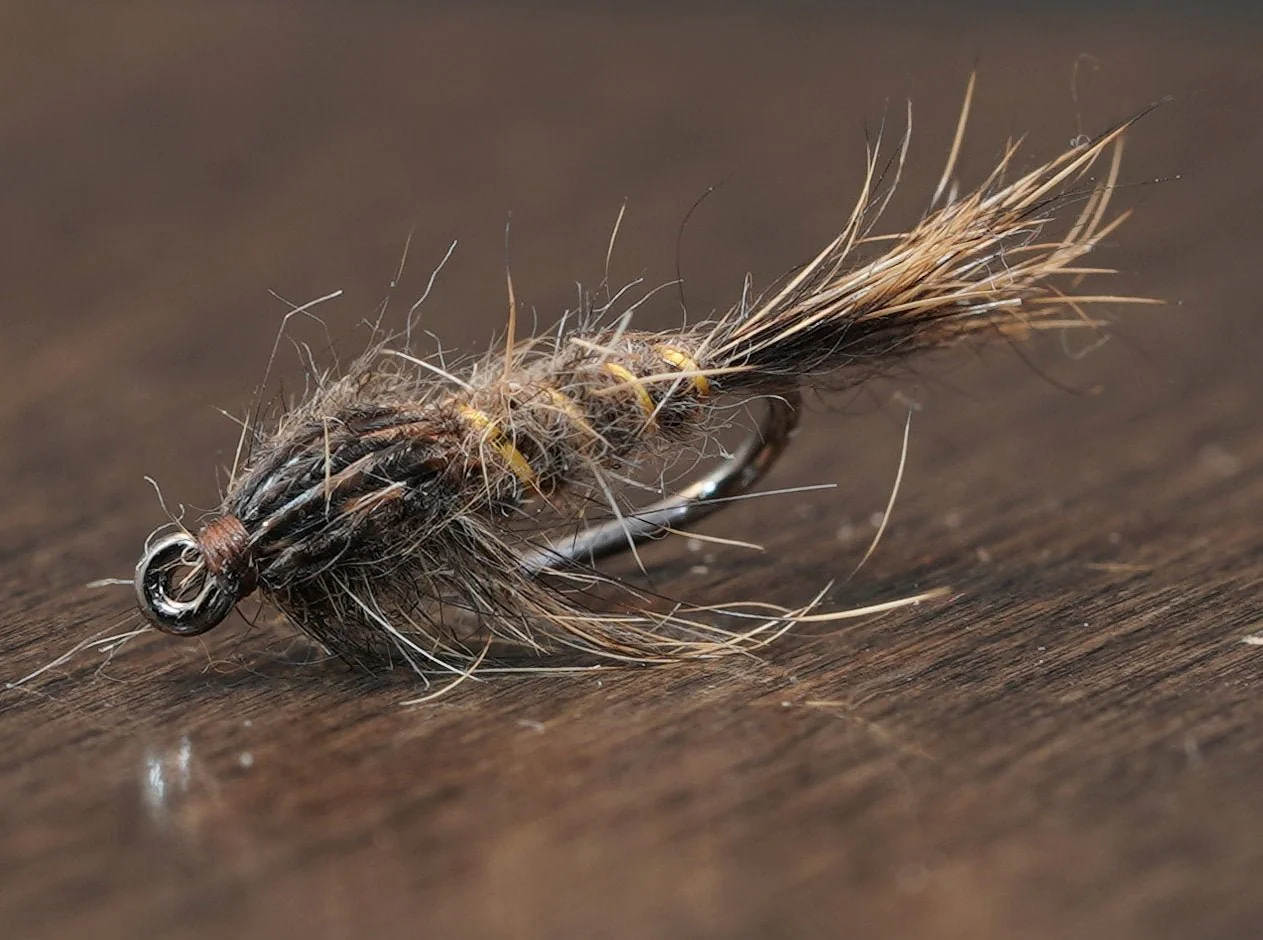
Brown / Dark
Darker caddis species — particularly in autumn — are better matched with a brown or dark ginger body. Also effective in low light conditions where a darker fly creates a stronger silhouette.
Best for: autumn caddis hatches, evening fishing, low light
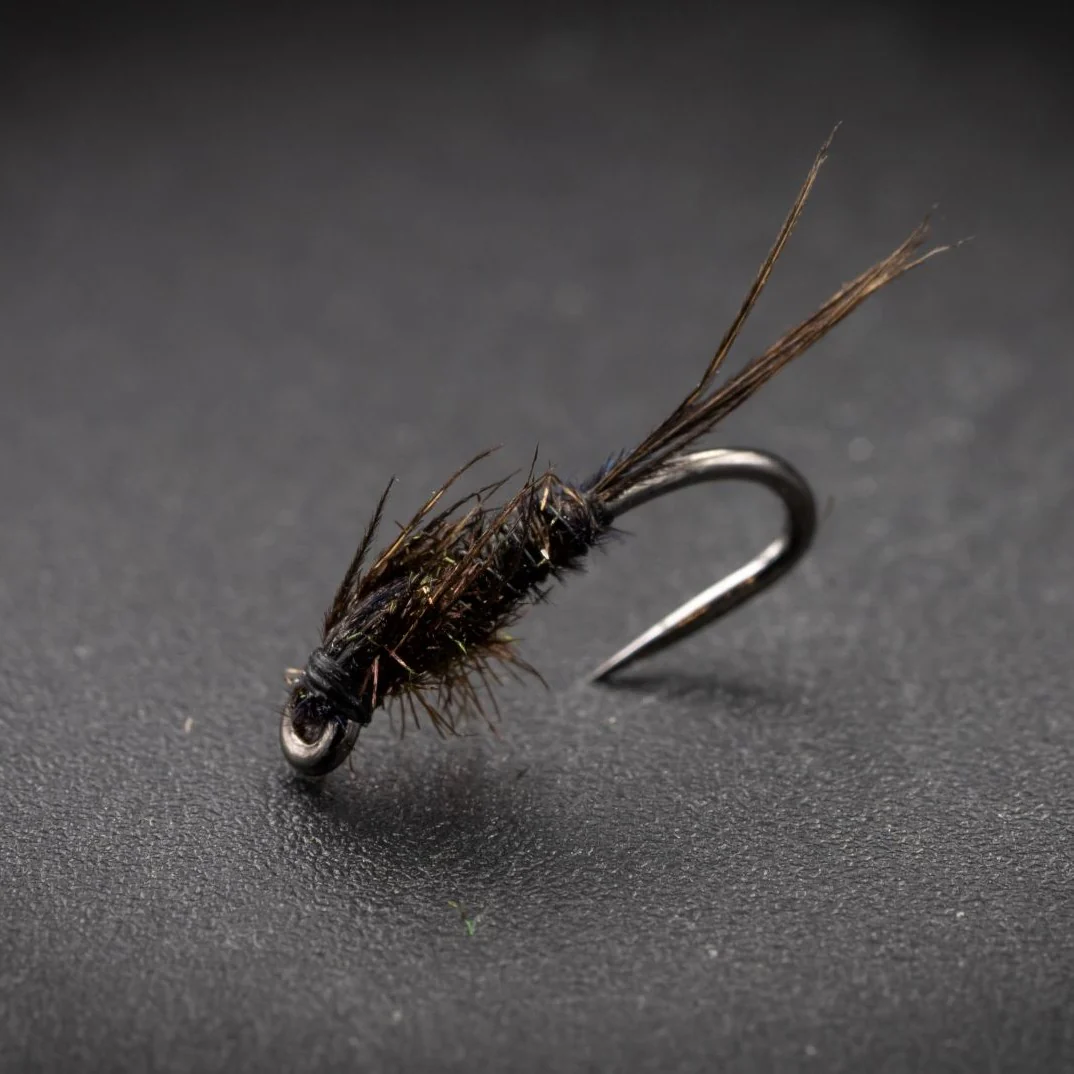
Black
A fully black Elk Hair Caddis — black dubbing, black hackle, dark elk hair — is a surprisingly effective searching pattern in broken water and an excellent choice for evening and night fishing when silhouette matters more than colour matching.
Best for: broken water searching, evening and night fishing
How to Fish the Elk Hair Caddis
Dead Drift
The standard presentation. Cast upstream and across, mend line as needed, and allow the fly to drift naturally without drag. Works well for fish feeding steadily during a hatch.
The Skating Caddis
Unlike mayflies, adult caddis skitter actively across the surface. When fish are chasing moving caddis — indicated by splashy, aggressive rises — a slightly dragged or deliberately skated fly is often more effective than a dead drift.
After the fly lands, allow it to drift naturally for a moment, then twitch the rod tip slightly to skate the fly across the surface. Alternatively, mend downstream rather than upstream to introduce controlled drag into the presentation. Takes on a skating caddis are violent and immediate.
The Dry-Dropper
A large Elk Hair Caddis (size 10–12) in fast water makes an excellent dry fly component of a dry-dropper rig — it's visible, floats high, and supports a reasonable weight of nymph below it. Suspend a beadhead Hare's Ear or Pheasant Tail 30–50cm below the elk hair caddis and cover pocket water thoroughly.
Evening Fishing
Caddis hatches often intensify at dusk. The last hour of evening light frequently produces the fastest caddis dry fly fishing of the day — fish feeding aggressively on both emerging and egg-laying adults. The Elk Hair Caddis fishes well in low light due to its high-riding profile and visible wing. Switch to a black variant as light fades completely.
🎣 Log when caddis hatches happen on your water. Hatch timing is highly specific to individual rivers and seasons. Logging water temperature, date, and hatch activity on Flyloops builds a hatch calendar for your home water over time — so you know exactly when to have an Elk Hair Caddis tied on. Start your free logbook →
Frequently Asked Questions
What size Elk Hair Caddis should I use? Size 14 is the most useful all-round size for most rivers. Go smaller (16–18) for selective fish in clear, slow water. Go larger (10–12) for fast, broken water where visibility is important, or during hatches of larger caddis species.
What's the difference between elk hair and deer hair for the wing? Elk hair has coarser, stiffer fibres than deer hair and stacks more easily to even tips. It also tends to flare less when tied in, making it easier to control. Deer hair is softer and more prone to flaring — it works fine but is less forgiving for beginners. Start with elk hair.
My elk hair wing keeps spinning around the hook when I tie it in. What am I doing wrong? This is the most common Elk Hair Caddis tying problem. The fix is the pinch wrap technique — pinch the hair firmly against the top of the shank and keep pinching through the first two thread wraps before tightening. Don't let go of the hair until it's secured with at least three firm wraps.
Do I need a hair stacker? Yes, for this pattern. Unstacked elk hair tips are uneven and produce a messy, asymmetric wing that affects both the fly's appearance and its action on the water. A basic hair stacker costs $8–$15 and is worth it.
How do I treat an Elk Hair Caddis with floatant? Apply a small amount of paste floatant (Gink, Loon Aquel) to the hackle and body before fishing. Don't apply it to the wing — elk hair floats naturally and doesn't need treatment. After catching a fish, false cast the fly several times to dry it, then re-apply if needed. Avoid paste floatants on CDC variants — use powder floatant only.
Why does my Elk Hair Caddis sink quickly? Usually caused by: too much dubbing making the body heavy; too few hackle wraps reducing flotation; poor quality hackle with soft, webby fibres; or elk hair that's been pre-treated or is of poor quality. Use genuine dry fly hackle, keep the body slim, and palmer the hackle in evenly spaced turns.
Can I use the Elk Hair Caddis when there's no caddis hatch? Absolutely. The Elk Hair Caddis is an excellent searching dry fly throughout the season — its buoyant, high-riding profile and general attractor qualities mean fish will take it even when no caddis are present. It's particularly effective in fast, broken water where fish have little time to inspect the fly.
Tied your first Elk Hair Caddis? Log your first dry fly session on Flyloops and start building your hatch calendar for your home water.